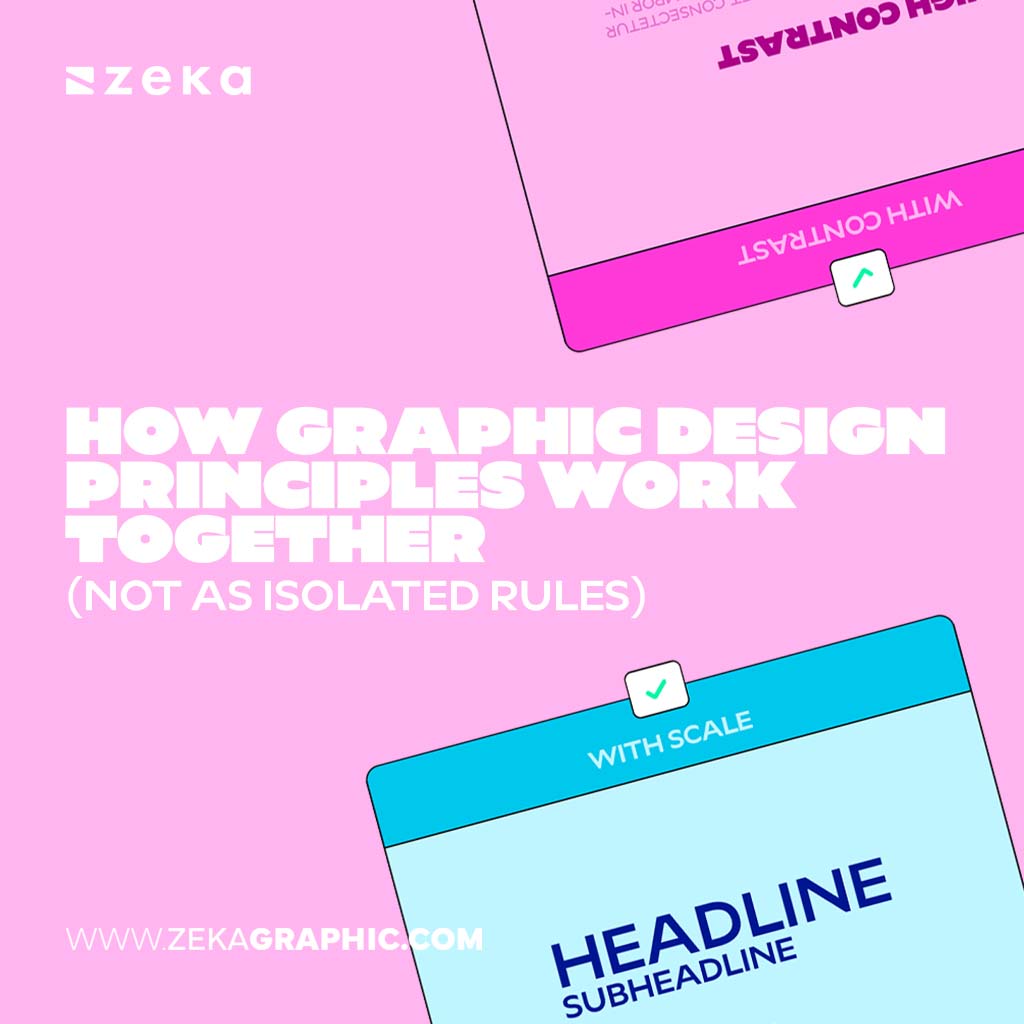
Learning Adobe After Effects shortcuts is one of the fastest ways to improve your workflow. Instead of constantly navigating menus, you can access tools, animate layers, and preview compositions instantly. The result is a faster, smoother editing process that lets you focus on creativity rather than software navigation.
In this guide, you’ll find the most useful After Effects shortcuts for designers, animators, and motion graphics artists who want to work more efficiently.
Advertisment
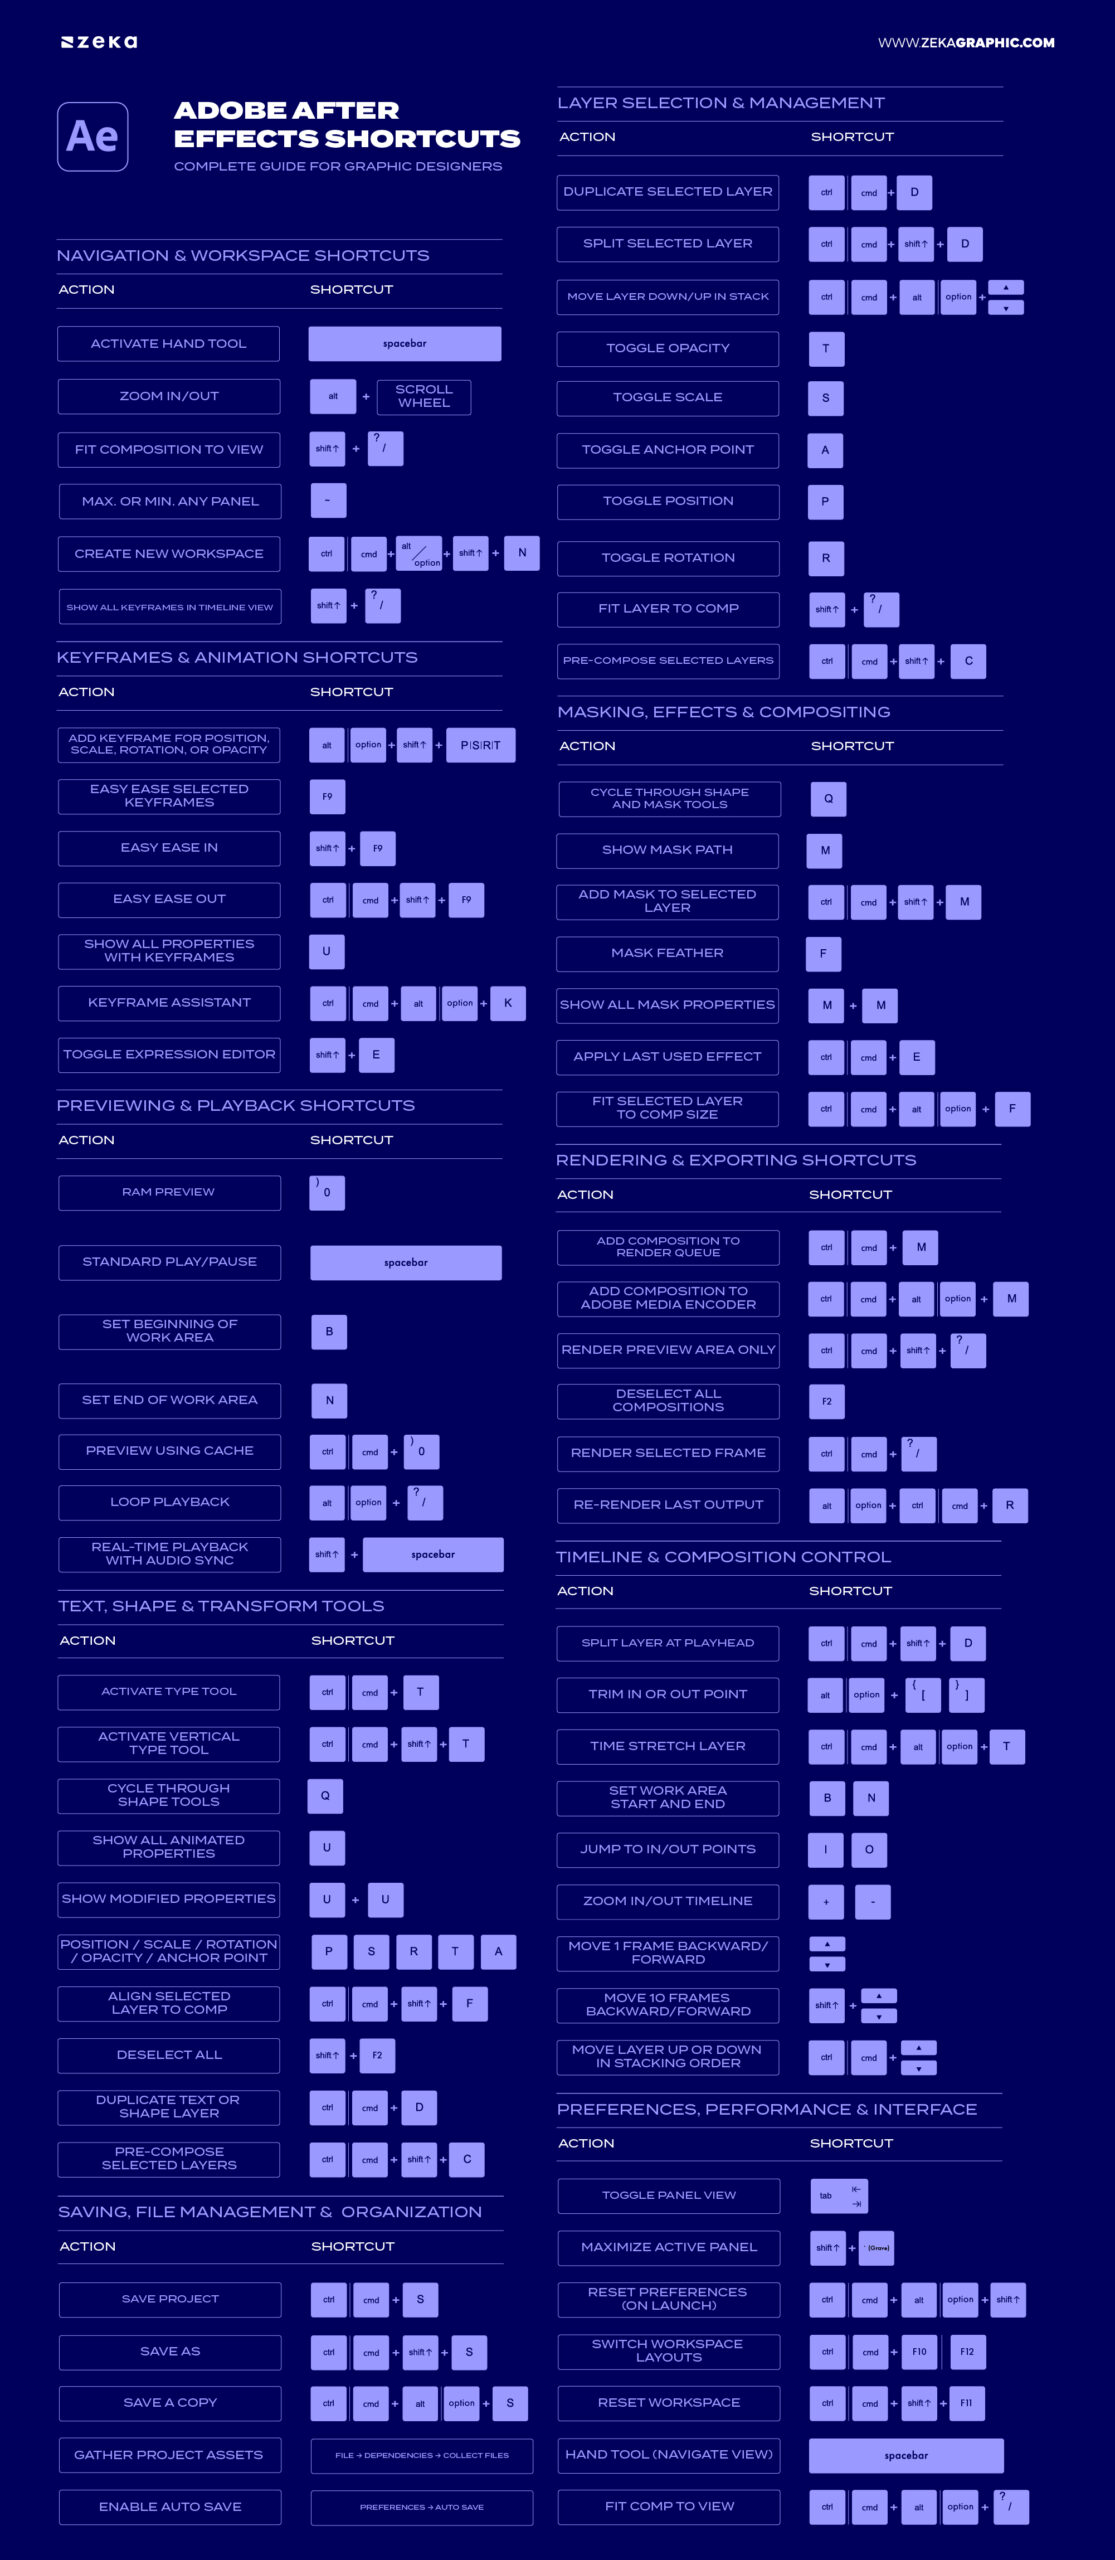
When working on complex animations, navigating the timeline and workspace efficiently becomes essential. These shortcuts help you switch between panels, zoom into keyframes, and move around compositions faster, reducing unnecessary clicks and keeping your attention on the animation itself.
Action | Shortcut |
Temporarily activate Hand tool (pan around composition) | Spacebar |
Zoom in/out of the Composition window | Alt/Option + Scroll Wheel |
Fit composition to view | Shift + / |
Maximize or minimize any panel | ~ (Tilde) |
Create new workspace | Ctrl/Cmd + Alt/Option + Shift + N |
Show all keyframes in Timeline view | Shift + ? |
Pro Tip: Use custom workspaces for specific projects (e.g., “Animation,” “Color,” “Compositing”) to minimize menu switching.

When working with dozens of elements — text, shapes, footage, and effects — your layer management can make or break your productivity. These shortcuts let you select, group, and organize layers instantly, so you can focus on animation rather than housekeeping.
Action | Shortcut |
Duplicate selected layer | Ctrl/Cmd + D |
Split selected layer | Ctrl/Cmd + Shift + D |
Move layer down/up in stack | Ctrl/Cmd + Alt/Option + ↓ / ↑ |
Toggle Opacity | T |
Toggle Scale | S |
Toggle Anchor Point | A |
Toggle Position | P |
Toggle Rotation | R |
Fit layer to comp | Shift + / |
Pre-compose selected layers | Ctrl/Cmd + Shift + C |
Pro Tip: For selecting multiple layers in After Effects, click the first layer, then Shift-click the last. You can also use the Parent & Link feature to move grouped layers together.

Advertisment
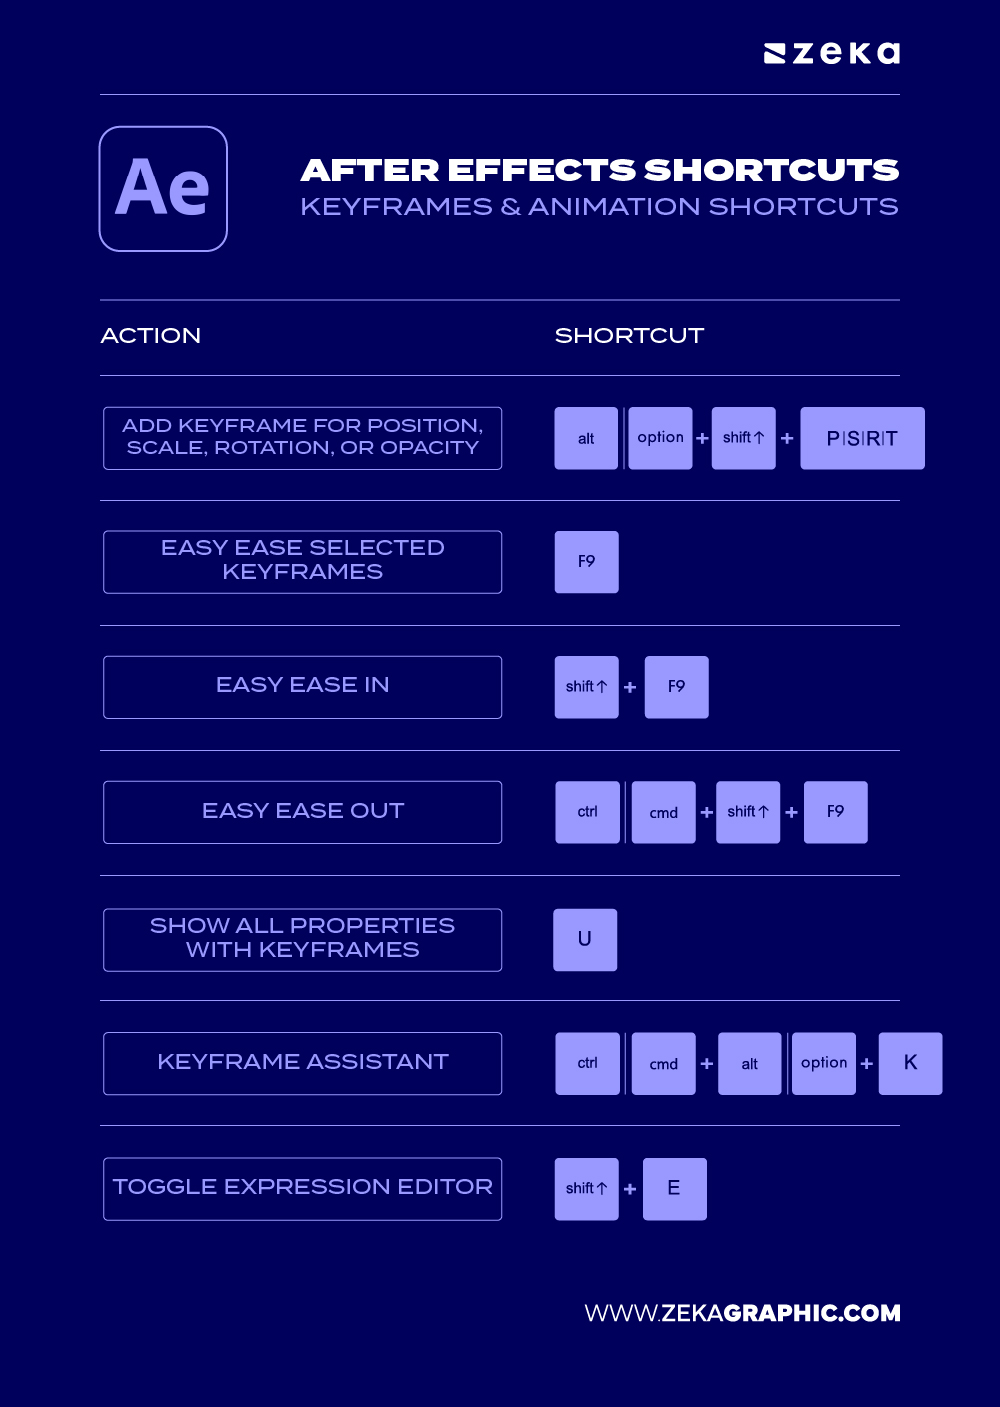
Keyframes are the foundation of all animation. Mastering keyframe shortcuts gives you precision control over timing and easing — essential for fluid, professional-quality motion.
Action | Shortcut |
Add keyframe for Position, Scale, Rotation, or Opacity | Alt/Option + Shift + P/S/R/T |
Easy Ease selected keyframes | F9 |
Easy Ease In | Shift + F9 |
Easy Ease Out | Ctrl/Cmd + Shift + F9 |
Show all properties with keyframes | U |
Keyframe Assistant (sequence or stagger layers) | Ctrl/Cmd + Alt/Option + K |
Toggle Expression Editor | Shift + E |
Pro Tip: The Graph Editor is your best friend for natural movement. Combine Easy Ease with value graph adjustments to create smoother animations.
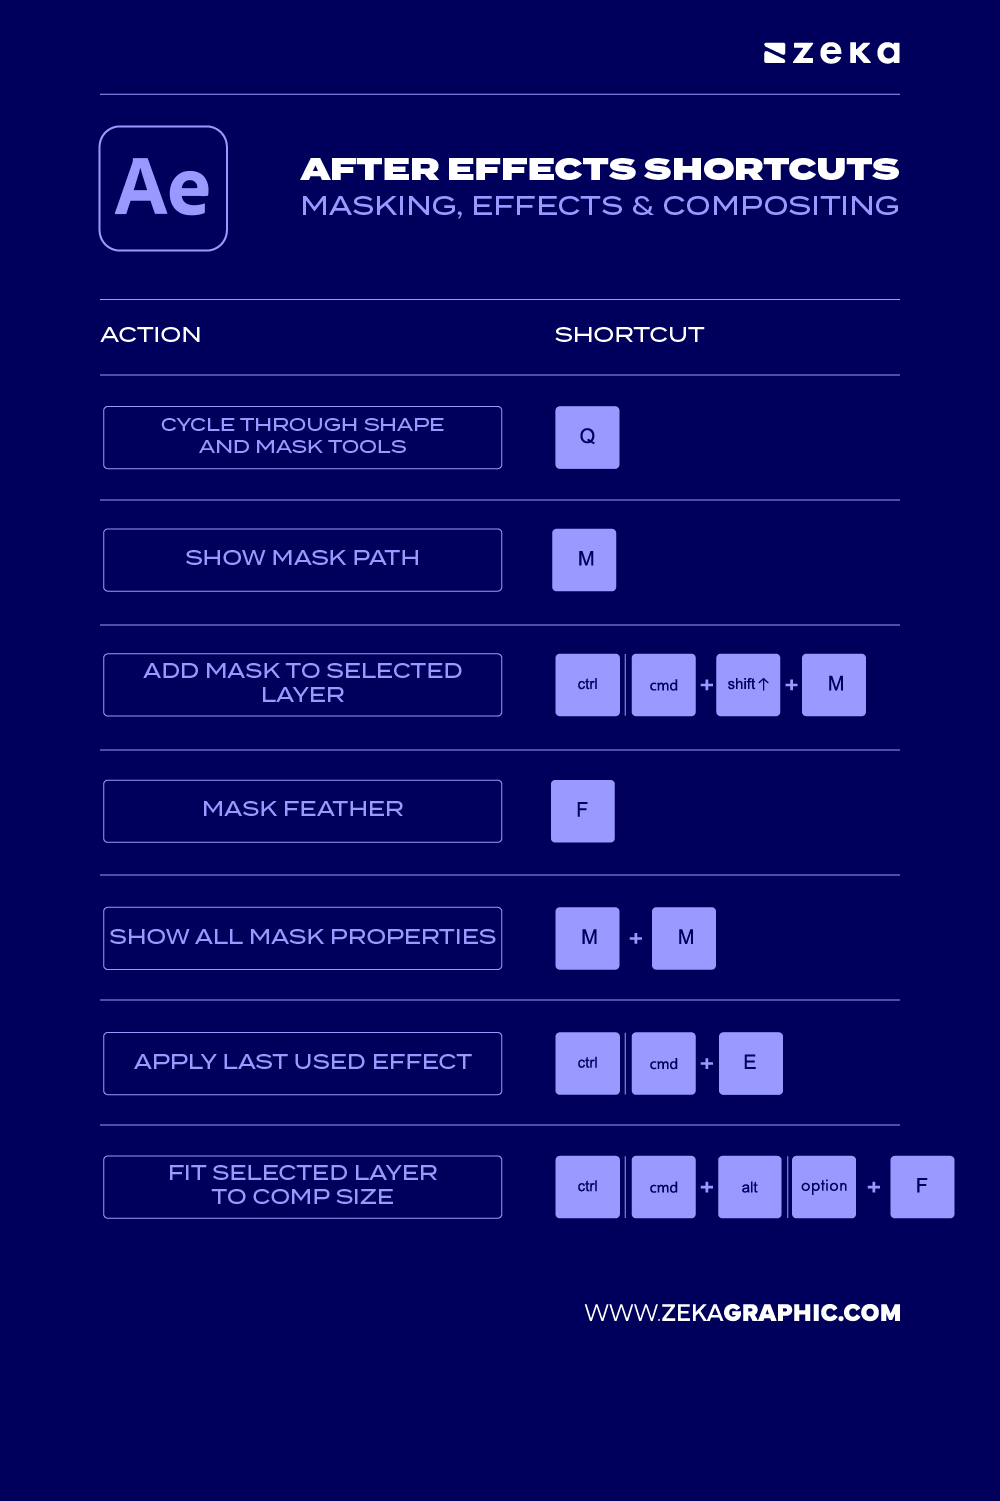
Masking and effects define the visual polish in After Effects. Whether you’re creating cinematic transitions or compositing multiple scenes, mask shortcuts speed up detail work and make your edits more precise.
Action | Shortcut |
Cycle through Shape and Mask tools | Q |
Show mask path | M |
Add mask to selected layer | Ctrl/Cmd + Shift + M |
Mask Feather | F |
Show all mask properties | M + M (double tap) |
Apply last used effect | Ctrl/Cmd + E |
Fit selected layer to comp size | Ctrl/Cmd + Alt/Option + F |
Pro Tip: Use mask path shortcuts to isolate effects for color correction or lighting, especially in compositing workflows. Adjust feather and expansion interactively to blend transitions seamlessly.
Advertisment
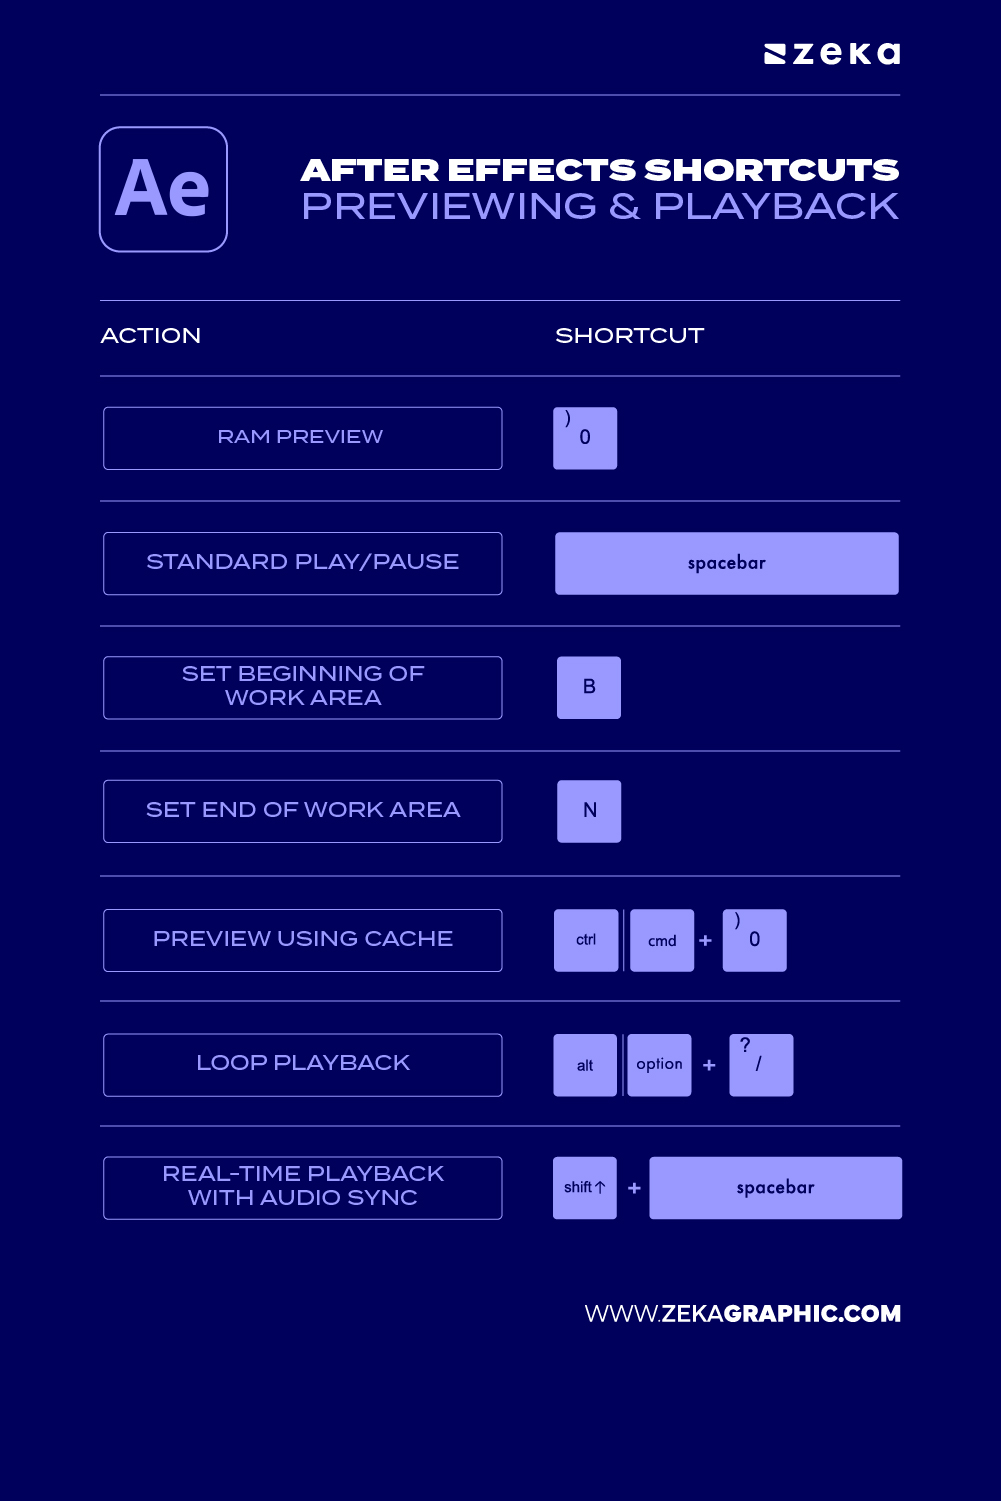
Previewing animations efficiently is crucial when fine-tuning motion timing. These preview shortcuts help you run smooth RAM previews, loop compositions, and adjust playback speed — so you can test your sequences without interruptions.
Action | Shortcut |
RAM Preview (Play from start) | 0 (Numpad) |
Standard Play/Pause | Spacebar |
Set beginning of work area | B |
Set end of work area | N |
Preview using cache | Ctrl/Cmd + 0 |
Loop playback | Alt/Option + / |
Real-time playback with audio sync | Shift + Spacebar |
Pro Tip: Trim your work area to focus only on active frames. This speeds up RAM previews and reduces render time significantly.
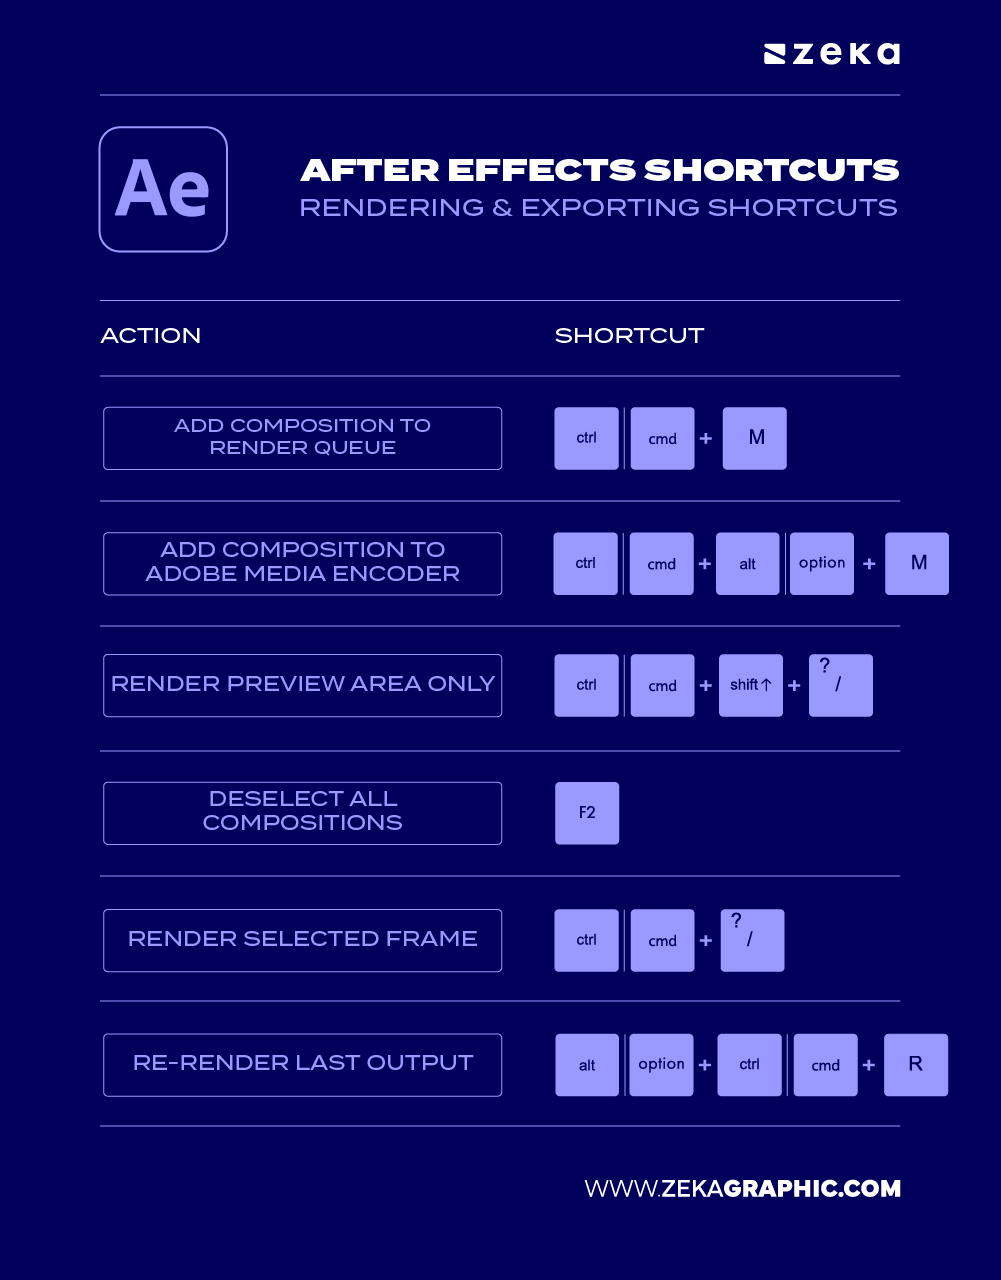
When deadlines hit, exporting efficiently becomes your best friend. These render and export shortcuts help you queue, encode, and deliver projects quickly — whether you’re exporting for web, broadcast, or client previews.
Action | Shortcut |
Add composition to Render Queue | Ctrl/Cmd + M |
Add composition to Adobe Media Encoder | Ctrl/Cmd + Alt/Option + M |
Render preview area only | Ctrl/Cmd + Shift + / |
Deselect all compositions | F2 |
Render selected frame | Ctrl/Cmd + / |
Re-render last output | Alt/Option + Ctrl/Cmd + R |
Pro Tip: Use Adobe Media Encoder to export multiple compositions simultaneously. You can even set output templates to automate delivery for YouTube or social platforms.
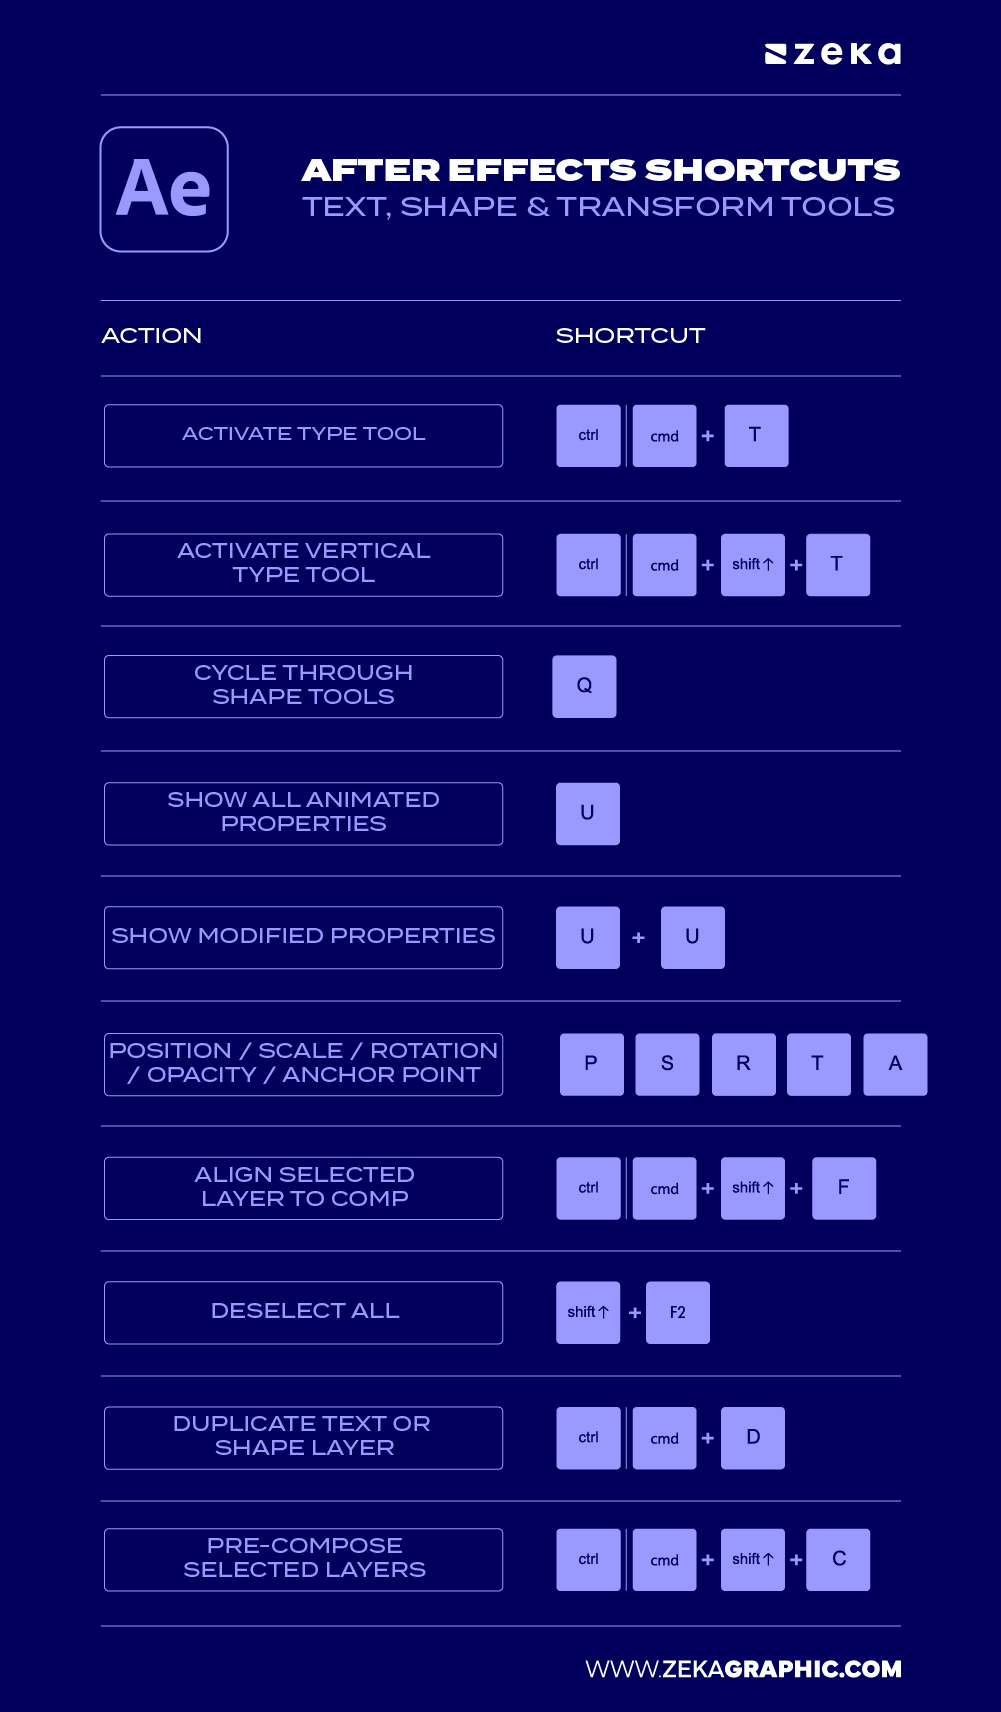
Text and shape layers are the foundation of many motion graphics projects. Knowing the shortcuts for creating shapes, editing text, and accessing transform properties allows you to work more fluidly and make adjustments without interrupting your creative flow
Action | Shortcut |
Activate Type Tool | Ctrl/Cmd + T |
Activate Vertical Type Tool | Ctrl/Cmd + Shift + T |
Cycle through Shape Tools (Rectangle, Ellipse, Polygon, etc.) | Q |
Show all animated properties | U |
Show modified properties | U + U (double tap) |
Position / Scale / Rotation / Opacity / Anchor Point | P / S / R / T / A |
Align selected layer to Comp | Ctrl/Cmd + Shift + F |
Deselect all | Shift + F2 |
Duplicate text or shape layer | Ctrl/Cmd + D |
Pre-compose selected layers | Ctrl/Cmd + Shift + C |
Pro Tip: Pre-compose animated text and shape layers to make future revisions easier and keep your project organized.
Advertisment
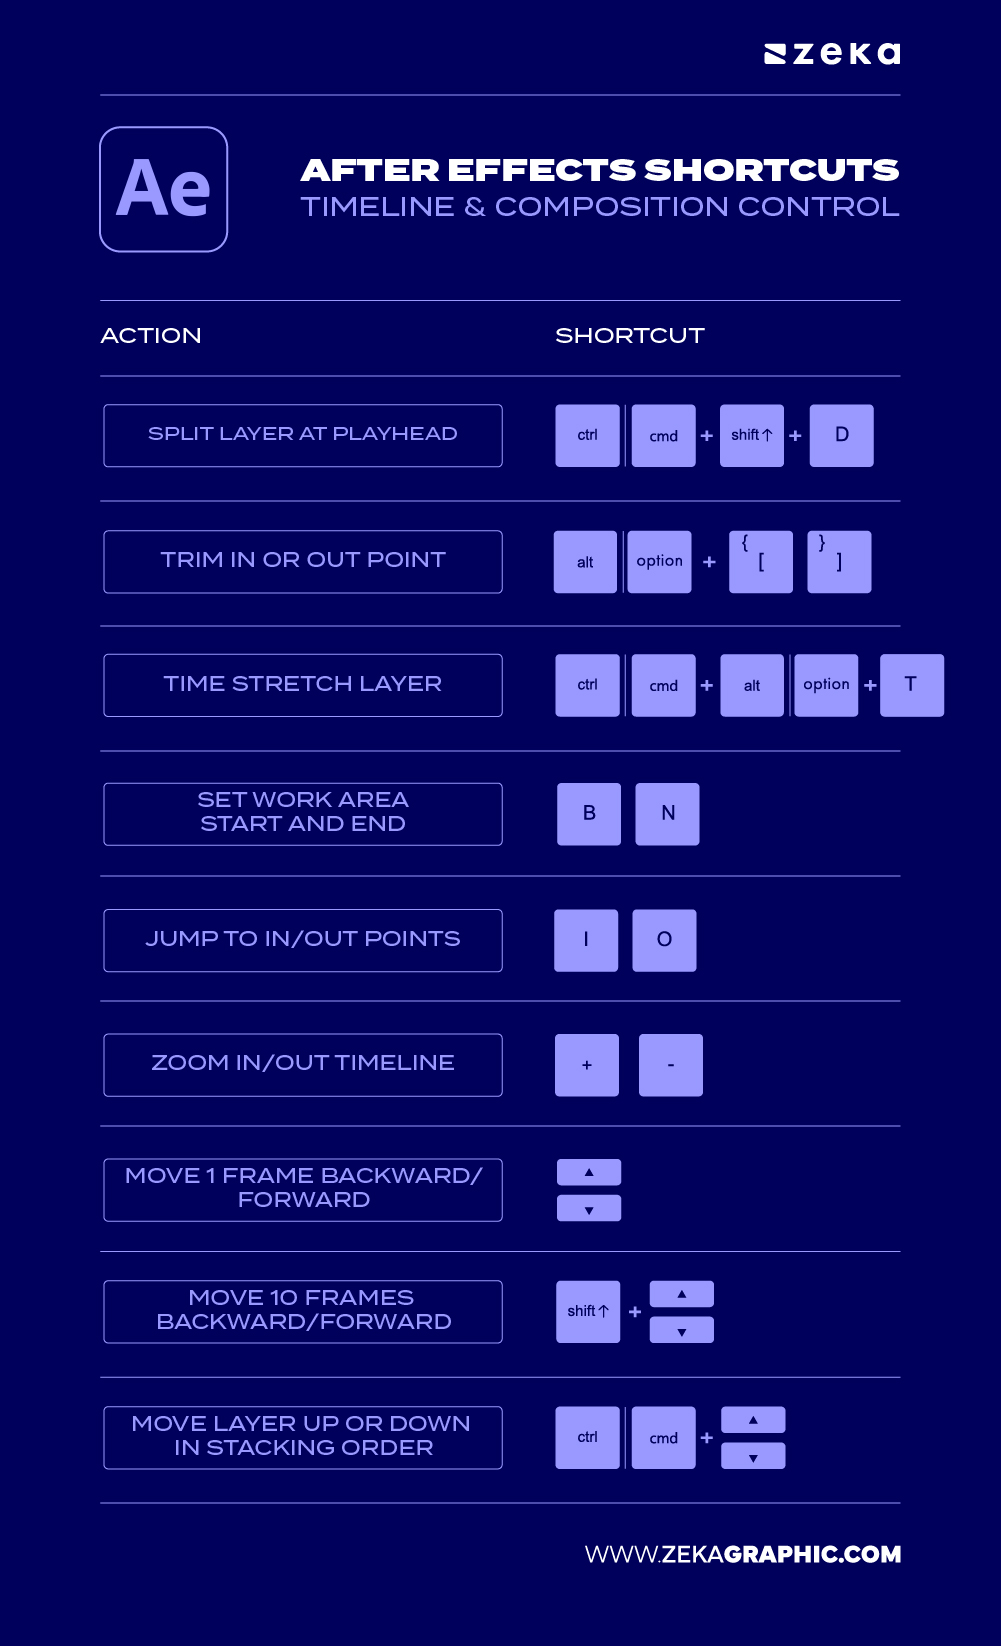
A well-organized timeline makes animation faster and easier to manage. These shortcuts help you trim layers, split clips, adjust timing, and navigate complex compositions without slowing down your workflow.
Action | Shortcut |
Split layer at playhead | Ctrl/Cmd + Shift + D |
Trim in or out point | Alt/Option + [ or ] |
Time stretch layer | Ctrl/Cmd + Alt/Option + T |
Set work area start and end | B / N |
Jump to in/out points | I / O |
Zoom in/out timeline | + / – |
Move 1 frame backward/forward | Page Up / Page Down |
Move 10 frames backward/forward | Shift + Page Up / Down |
Move layer up or down in stacking order | Ctrl/Cmd + ↑ / ↓ |
Workflow Tips:
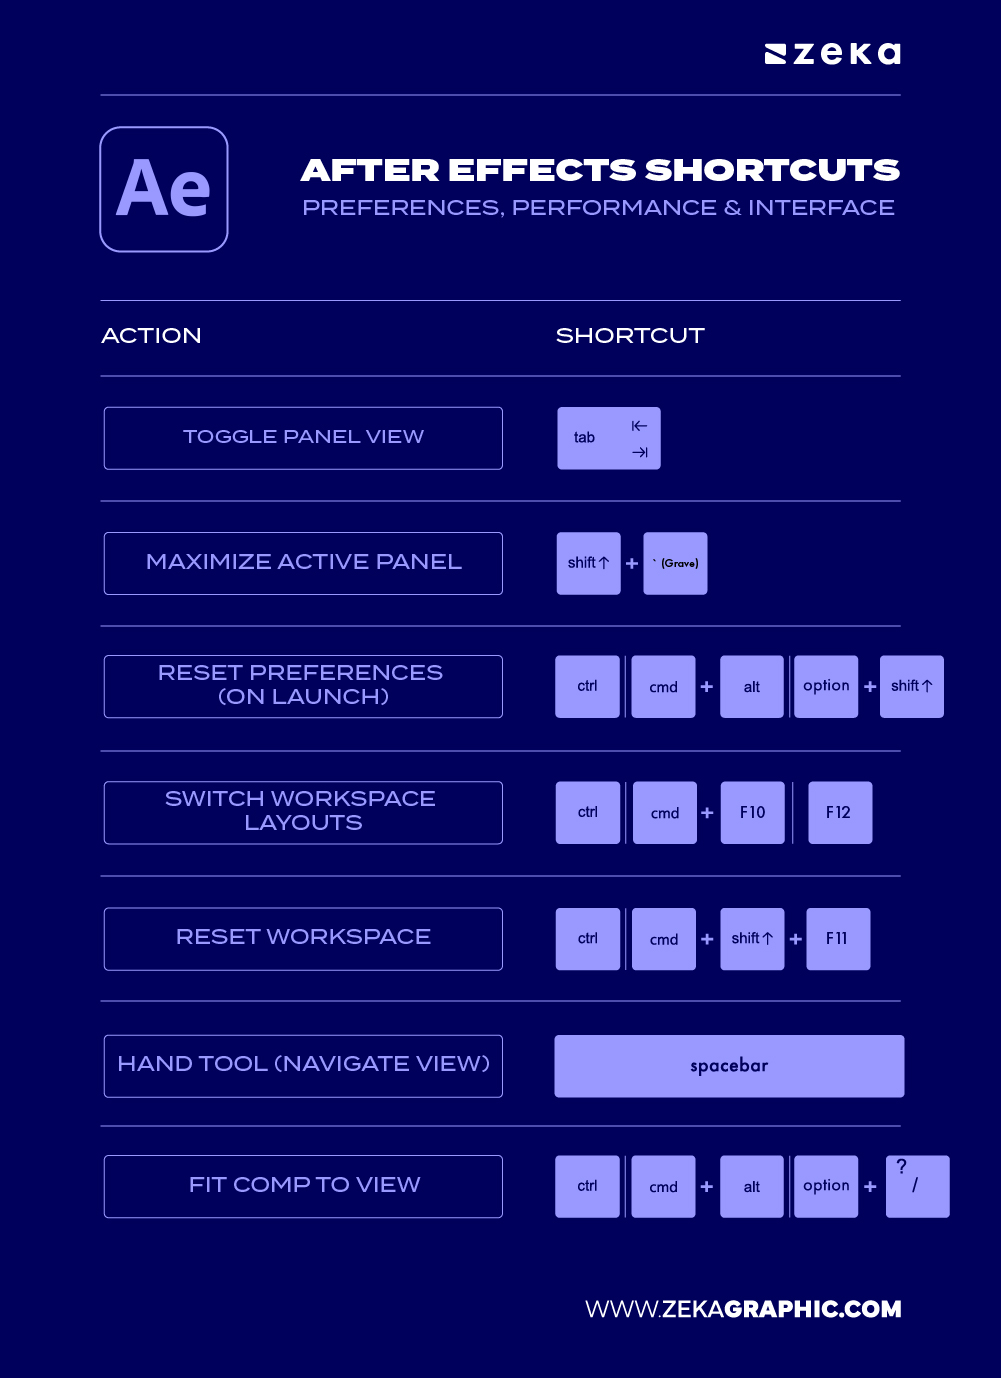
Performance matters, especially in larger projects. These shortcuts help you manage panels, switch workspaces, and optimize your interface so you can work faster and keep After Effects running smoothly.
Action | Shortcut |
Toggle panel view | Tab |
Maximize active panel | Shift + ` (Grave) |
Reset preferences (on launch) | Hold Ctrl/Cmd + Alt/Option + Shift while opening AE |
Switch workspace layouts | Ctrl/Cmd + F10–F12 |
Reset workspace | Ctrl/Cmd + Shift + F11 |
Hand tool (navigate view) | Spacebar |
Fit comp to view | Ctrl/Cmd + Alt/Option + / |
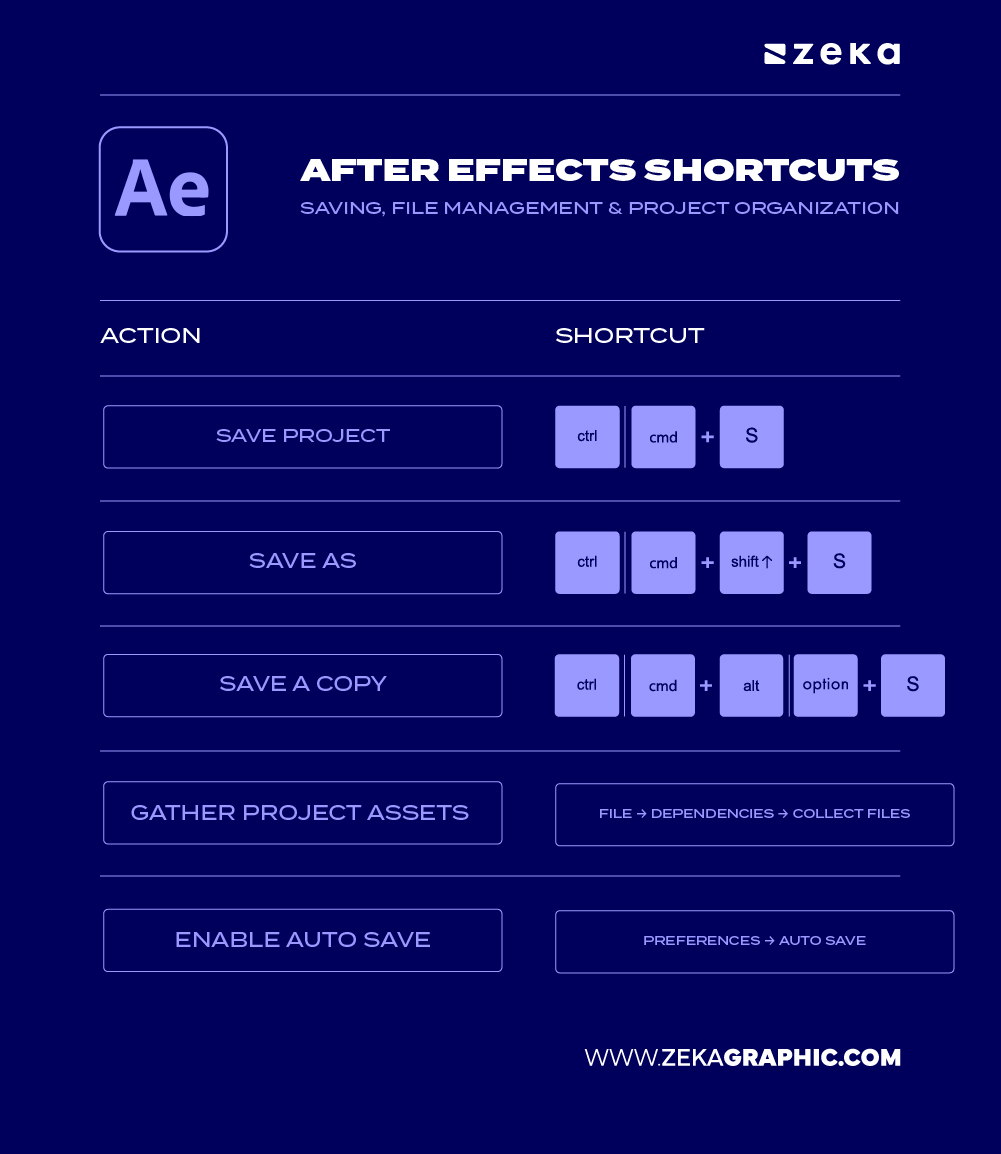
Good file management is just as important as good animation. Regularly saving your work, organizing assets, and maintaining clear project structures helps prevent data loss and makes collaboration easier.
Action | Shortcut |
Save project | Ctrl/Cmd + S |
Save As | Ctrl/Cmd + Shift + S |
Save a Copy | Ctrl/Cmd + Alt/Option + S |
Gather project assets (Collect Files) | File → Dependencies → Collect Files |
Enable Auto Save | Preferences → Auto Save |
Quick Tips:
Motion design projects often involve clients, editors, and other designers. These tools and shortcuts help streamline reviews, share assets efficiently, and keep project versions organized throughout the production process.
Shortcut | Action |
Cmd/Ctrl + M | Add to Render Queue |
Cmd/Ctrl + Alt + M | Add to Adobe Media Encoder |
Cmd/Ctrl + Shift + / (forward slash) | Reveal render queue |
Cmd/Ctrl + Shift + K | Project settings |
Cmd/Ctrl + Shift + F12 | Share current workspace via Creative Cloud |
No two motion designers work exactly the same — which is why customizing your After Effects shortcuts is a total game-changer. By setting up personal hotkey profiles, you can turn repetitive clicks into single keystrokes and align the interface to your unique workflow.
To customize, go to Edit → Keyboard Shortcuts and create profiles for different tasks (e.g., animation vs. compositing). You can even export and share these profiles with teammates. For advanced automation, pair your shortcuts with scripts or expressions — ideal for repetitive actions like pre-comping, renaming, or rendering sequences.
Designers who invest time in this setup often cut their editing time by 30–40%. It’s all about making After Effects work for you, not the other way around.
Shortcut | Action |
Cmd/Ctrl + Alt + ‘ | Open Keyboard Shortcuts panel |
Cmd/Ctrl + Shift + F11 | Reset workspace layout |
Cmd/Ctrl + K | Composition settings |
Cmd/Ctrl + Option/Alt + S | Save current workspace |
F9 / Shift + F9 | Easy Ease / Easy Ease In |
Cmd/Ctrl + Return | Apply expression to selected property |
Extra Tip: Explore automation tools like AE Scripts to expand your workflow possibilities — from batch renaming to advanced render management.
1. What are the most useful shortcuts in After Effects?
Some of the most useful After Effects shortcuts include Spacebar (Play/Pause Preview), U (Show keyframes), P (Position), S (Scale), R (Rotation), and T (Opacity). Learning these speeds up your After Effects workflow dramatically.
2. How do I see all keyboard shortcuts in After Effects?
Press Ctrl + Alt + ’ (Windows) or Cmd + Opt + ’ (Mac) to open the Keyboard Shortcuts Editor and view or customize every command.
3. How can I speed up my workflow in After Effects?
Use keyboard shortcuts, precompositions, null layers, and expressions to reduce manual tasks. Optimizing your animation workflow in AE can cut your editing time in half.
4. Can I create custom shortcuts in After Effects?
Yes. Go to Edit > Keyboard Shortcuts and remap any function to a key combination that fits your style — perfect for a personalized shortcut-based workflow.
5. What are the best shortcuts for animation in After Effects?
Top animation shortcuts include E (Show Effects), Alt + Drag Keyframe (Time stretch), F9 (Easy Ease), and Ctrl + Shift + D (Split Layer). These time-saving animation techniques make your workflow smoother.
Advertisment
Mastering Adobe After Effects shortcuts is one of the simplest ways to become a faster and more efficient motion designer. The less time you spend searching through menus, the more time you can dedicate to animation, storytelling, and creative experimentation.
Start by learning a few shortcuts at a time and use them consistently. As they become second nature, you’ll notice a smoother workflow, faster edits, and greater control over every project.
The best After Effects users aren’t necessarily the fastest artists—they’re often the ones with the most efficient workflows.
If you found this post useful you might like to read these post about Graphic Design Inspiration.
Advertisment
Written by
If you like this post share it on your social media!


Advertisment

Advertisment